วันอังคารที่ 8 เมษายน พ.ศ. 2551
Loosen up the split gear on a Raptor 50
The original white gear moves very difficult over the aluminum autorotation hub. It is designed this way to give the white tail gear some support since it is pulled towards the back of the heli by the tail belt. It is supposed to wear in over time, but this takes way too long. The method described below, will wear in the tail gear so that it rotates freely, and is still properly supported by the aluminium autorotation hub.
Just put the main shaft in a drilling machine, and attach the autorotation hub with the grey gear and the white tail gear to the main shaft as shown in the picture below.
Now hold the grey gear as shown, and slowly start the drilling machine. Now increase the speed of the drilling machine, and keep it rotating until the white gear starts to spin freely. Let it cool down for a couple of seconds, and feel if it rotates freely. If not, repeat this a couple of times. This will perfectly match the new white gear to your aluminum autorotation hub so that it rotates as it should, and that it is still properly supported by the autorotation hub.
This fix will only take a couple of minutes and is much easier than grinding or sanding the white gear! Furthermore, this way guarantees a perfect round fit with good support.
Setting up the 401 gyro
Put the trim of your rudder channel in the zero position including sub trim etc. Make sure that there is no revo or any other mixing to your rudder channel!. Program you Tx such that you can control the heading hold and rate modes of your gyro (connect a channel that you can switch to the gain channel). Now put your tx in heading hold mode, and turn on your receiver and wait for the gyro to initialize (the led should go on continuously). Now switch your gyro gain channel such that the gyro goes into rate mode (led goes off). Now turn down the limit pot on your gyro. Next put the rudder stick in one of the extremes, and rotate the limit pot until there is a maximum control throw on the blades without binding (check both directions). Choose the limit such that there is no binding on either sides.
Next put the ATV or EPA values of your TX rudder channel on 100% (reasonable piro rate for now). If you ever want a faster piro, you can turn up the ATV or EPA of your rudder channel. Now control your ATV or EPA values of the gain channel in both directions to 50%. Your basic setup of the gyro is done.
Go and fly and check how she feels. You can now turn up the ATV values of the gain channel in both gyro modes for all your idle ups such there is no oscillation in your tail (wagging). You can test this best by diving the helicopter from some height. If it does not oscillate there, then it is ok. Make sure that your gain is e.g. 5% below your maximum setting for the different idle ups (less strain on your servo). After this you can adjust the piro rate to your liking by adjusting the ATV of the rudder channel.
That’s it, you’re done.
วันอาทิตย์ที่ 30 มีนาคม พ.ศ. 2551
When you walk into the store or browse the Internet, you’ll notice most R/C helicopters come in different packages, RTF, ARF and Kit.
How can you tell which one is right for you? Well, you can talk to the salesperson for hours and try to figure out the words coming out of his mouth or you can read this condensed guide and find out in just a few minutes.
I know you have plenty of questions but the one I will try to answer will be…
Should I start with a RTF, ARF or a Kit?
It’s up to you! When I began with R/C helicopters, I didn’t know what I got myself into. I was in a fog, but as soon as it cleared, I had a kit package on my lap. Surprisingly, buying a kit was the best thing I ever did!
Why do I say this?
Well, the kit enabled me to really understand the inner working parts on my R/C helicopter. Every time I crashed it, I knew exactly on how to replace the broken parts.
But this is just some of the positives of buying a kit package, but that might not be the kind of experience you are looking for.
Some R/C helicopter packages are marked with RTF, ARF and KIT. This is just a fancy way of saying that you might need to get your hands dirty. But on the positive side, some kits all you do is take it out of the box, charge the battery and have fun.
Let’s look at this a little deeper and find out the differences in the kits. More on that after this message…
RTF (Ready To Fly):
The RTF package is short for (ready to fly) which means everything you need is contained within the box when you buy it. Most electric R/C helicopters come in this form. Nitro R/C helicopter RTF packages in the other hand are rare but they are available. RTF’s are perfect for people that have no time to devote to the assembling process.
ARF (Almost Ready-To-Fly):
The ARF is short for (almost ready-to-fly), which means that you have to do some of the dirty work yourself. You might have to separately buy and install the engine, blades or some other parts of the R/C helicopter to make it complete. The ARF is perfect for people with minimal time to devote to the assembly process.
KIT (Fully Disassembled):
Finally we have the fully disassembled KIT. According to the R/C Helicopter Forum, the Kit is the most popular form among nitro or electric beginners and intermediate. It comes in hundreds of unassembled pieces. You have to assemble it piece by piece. It’s mostly geared for people that have the time and those that are mechanically inclined or are willing to be.
My recommendation is get an R/C helicopter that gets you deeply involved in the heli setup process. This will give you a profound understanding of the inner working parts, making it easier when it comes time to replace them.
Well, until next time and stay safe.
วันศุกร์ที่ 28 มีนาคม พ.ศ. 2551
Lesson 2: RC Helicopter Flight Simulator
RC Helicopter Flight Simulator: A Beginner's Tool is a program or game that simulates the flight of a real RC helicopter, from the controls to the physics of flight, to weather conditions. The best of these is generally rather expensive, running from $130 to $200.
However, with a simulator, the inevitable crashes will not cost you time or money, unlike with a real model - you will be back flying again in the time it takes to load a screen. This means that the flight simulators are an excellent place to gain initial flying skills, polish complicated flying moves, and gain confidence, without worry of damaging an expensive model.
The outlay for a simulator can in fact save you money over time. When you gain your initial skills with a simulator, you avoid crashing your real model and having to make hundreds of dollars in repair to it before you can fly again. Because of this, you can gain your skills and confidence faster.
Also, when you want to try out more complex moves and stunts, you can test them on a simulator first and find out if the stunt is possible, and how it feels.
RC helicopter simulators come in many varieties
Some are truly nothing more than games - fun to play, but very poor simulation of the physics of flight and the handling of the helicopter. Any RC helicopter simulator that is for a game console is likely to be like this, and ineffective for learning on. Other simulators come as 'freeware' or 'shareware' programs for running on computers, where you pay nothing to try it out initially.
If it's shareware, you have to pay to either get more features or use it for more than a limited time. Some of these are very decent and are somewhat helpful for gaining skill; it is best to read reviews to determine which is worth your time. If you have a Macintosh computer, your only choice for a simulator is a freeware one, the AlphaOmega RC Helicopter simulator.
The best simulators are the ones you need to pay for, and are for Windows machines online. The top of the line is the Real Flight Generation 3 RC Flight Simulator, which even comes with a controller that models a real radio so you can get a total immersive experience.
This comes in both full and lite versions, the difference being a matter of options: with the lite version, you do not get the multi-player option or as much control over environmental variables.
It is, however, around $70 less expensive,the RC helicopter flight simulator also comes with the controller, and more than suitable for learning new RC helicopter flying skills.
Lesson 1: Helicopter Flight
Welcome to the world of R/C Helicopters. The helicopter is probably the most challenging form of radio control model, being mechanically complex in nature, and requiring 100% concentration while operating
Flying a model chopper is not unlike balancing a metal bearing or a marble on a piece of glass. If the mechanics of the chopper have been adjusted and aligned very well, it is similar to having a flat piece of glass. If the chopper is not set up just right, it is like having a convex piece of glass where the bearing wants to keep rolling off to one side.
The first thing the budding helicopter pilot must realize is that the model works on the very same principles as the full-size and controlling the chopper is just as difficult, if not more-so due to size and orientation. It is not simply a matter of pushing one button for up, and another for forward flight, etc.
Flying a helicopter, just like flying a model aircraft, is a skill that must be learned and that can only happen with practice . . . now that I have you thoroughly discouraged!
Although building and flying a model chopper can be complex, it is also extremely satisfying. Being able to accurately control a vehicle which you can hover, fly forward, backward, sideways, and do all kinds of interesting maneuvers and aerobatics, as well as land at your feet, is very exciting.
Unlike learning to fly a model airplane where flying with an instructor is a must, you basically learn to fly helicopters by yourself. Before you start flying, however, some time with an experienced helicopter pilot will be invaluable. He can help you set up your helicopter (it is extremely important to have the mechanics set up accurately for safe and easy flying) as well as give you some tips on flying; what to expect from your model and how to operate the controls.
How does a Chopper Work?
There are basically two different types of helicopters, those that have collective pitch and those that do not. Collective pitch is where the pitch ofthe main rotor blades may be simultaneously increased or decreased to change the amount of lift.
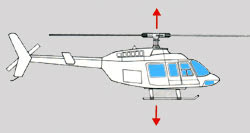
This gives a quicker response to changes in vertical thrust as controlled by the pilot. On helicopters without collective pitch, the amount of lift is controlled entirely by the speed of the rotor blades or in other words the speed of the engine (throttle control).
The reaction time is longer and thus the control is less responsive.
There is a trade-off, however, and that is the cost and complexity of the rotor head. There are a great deal more moving parts in a collective pitch rotor head and thus, they are more expensive. Most current choppers are of the collective pitch variety.
On a standard, collective pitch helicopter there are four controls and these are operated by five channels of your radio system. These controls are the collective pitch, the fore and aft cyclic pitch, the side to side cyclic pitch, and the tail rotor pitch. The collective pitch must also be coupled with the throttle of the engine so that when more load is put on the main rotor blades by increasing the pitch, more throttle is applied to help overcome the additional drag.
Helicopter flight is governed by the pitch, or angle, of its rotor blades as the sweep through the air. When climbing or descending, the pitch of each blade is changed simultaneously and to the same degree. To climb, the angle or pitch of the blades is increased. To descend, the pitch of the blade is decreased. Because all blades are acting simultaneously, or collectively
As a group.Together!'); return false">collectively, this is known as collective pitch. For forward, backward and sideways flight, an additional change of pitch is provided. By the means the pitch of each blade is increased at the same selected point in its circular pathway. This is known as cyclic pitch.
When a helicopter is started up and the rotors begin to turn they are maintained in flat pitch, with no angle, or bite on the air. As the engine warms up and the rotors turn faster, the collective pitch is increased and the helicopter lifts vertically. To make the aircraft fly forward, the collective pitch is retained, keeping the aircraft in the air, while the cyclic pitch is adjusted to enable each blade to have more bite as it passes over the tail.
To stop the helicopter and hover, the cyclic pitch is returned to neutral, causing the rotor blades to have the same pitch thought-out their cycle, allowing the collective pitch to retain the helicopter hovering in the air.
The left stick of your radio transmitter controls the collective and throttle in the vertical direction and the tail rotor pitch in the side to side direction. Your right stick controls both cyclic operations; up and down for fore and aft control and side to side for the cyclic side to side control. There are also mixing functions which mix the throttle and collective functions, and the throttle/collective and tail rotor functions.
Operation
The engine of a helicopter drives both the main rotor shaft and the tail rotor via a series of gears and a clutch. As the motor comes to speed, the clutch engages and begins to turn both rotor systems. Generally, at this point, there is no pitch on the main rotor blades and thus no lift. The throttle is increased until the main rotor blades are brought up to speed. To lift the helicopter collective pitch is applied.Because, for every action there is an equal and opposite reaction, when the engine is forcing the rotor blades to turn in one direction, the body of the helicopter will want to rotate in the opposite direction. The function of the tail rotor is to correct this tendency. The tail rotor blades provide enough thrust to the side to keep the helicopter pointing in one direction. By increasing or decreasing the pitch of the tail rotor blades the direction the helicopter is pointing can be changed.
The cyclic control permits the main rotor blades to be varied independently making the helicopter move in a horizontal direction. If one of the rotor blades increases pitch as it approaches the rear while the opposite blade decreases in pitch while approaching the front during its rotation, more lift will be produced in the rear, tilting the helicopter forward, and thus moving the helicopter in a forward direction.
The same principle applies for side to side and rearward, allowing the helicopter to fly in any direction.
The control of the cyclic and collective pitch is transferred from the radio servos to the rotor blades via the swash plate. Part of the swash plate is stationary while the other part is allowed to rotate with the rotor head. Control linkage is connected from the servos to the stationary part of the swash plate as well as from the rotating part of the swash plate to the rotor head.
When flying a chopper, small control inputs are continually required by the pilot to correct for deviations in the flight path. That is why 100% concentration is required in chopper operation. The more accurately the chopper is set-up, the fewer the number of corrections that are required by the pilot.
What Happens if the Engine Stops?
Auto-rotation is a way for helicopters to land successfully after a loss of power from the engine to the rotor drive systems.
This is accomplished with the aid of a special device known as an auto-rotation clutch which allows the rotor blades to free-wheel. As soon as power has been cut, the throttle/collective control is brought back all the way.
This will usually bring the main rotor blades to have slightly negative pitch. As the helicopter starts to descend, the air moving through the blades will keep them spinning. The spinning blades will act like a parachute in reducing the helicopters decent. When the helicopter nears the ground, the pilot increases the collective pitch making the pitch of the blades again positive.
The momentum of the blades is converted to lift, slowing the descent of the helicopter down further, enabling it to land softly.
วันศุกร์ที่ 21 มีนาคม พ.ศ. 2551
OS Engines For RC Helicopters
Which Nitro R/C Helicopter Engine Size Is Right For Me?
There are several engine brands available in the market, but today we are going to talk about my favorite engine. The O.S. engine.
This is the most popular brand out on the market today. I’ve played around with this engine brand so I think I can pretty much talk about it.
The engine is available in various sizes with each offering its own flavor. I will just cover the most common sizes
The first type of engine is the .32-.37 cubic inches size.
someone who is new to R/C helicopters. This engine delivers a fair amount of power, while being tough and reliable. Though it’s a bit louder than some of the bigger O.S. engines types, this engine size provides a punch and will enable you to perform some acrobatic moves.
The second type of engine is the .50 cubic inches size.
This engine is designed for class 50 R/C helicopters. The Class 50 O.S. Engines are well-suited for both beginners and somewhat more intermediate flyers. This engine also fits the Raptor 50 and the Sceadu 50.
Though a bit more expensive than the Class 32-37s noted above, the Class .50 O.S. Engine provides a great deal of power, and more than enough juice to achieve any aerobatic move you desire. The only drawback; more power means more fuel consumption.
The third type of engine is the .61-.70 cubic inches size.
The Class O.S. Class 61-70 Engines are great for the intermediate-to-advanced flyer. And they’re also called, of course, BIG ENGINES! Designed for any 60-class helicopter,
the O.S. Class 61-70 Engines are great for the intermediate-to-advanced flyer who knows what to do with the immense power that these engines provide.
Virtually any 3D move (e.g. inverted) can be accommodated via this power. Again, however, more power means more fuel consumption, and a bigger price tag.
The fourth type of engine is the .91cubic inch size.
The Class 90 O.S. Engines are immense and suited for the highly advanced and expert flyer.Folks, it doesn’t get bigger than this. Designed to fit class 90 helicopters, the Class 90
O.S. Engines are immense and suited for the highly advanced and expert flyer. But I have seen people, just out of the hobby shop, using these.
Trust me, you don’t want to drop the big money on one of these engines if you aren’t sure you know how to handle it!
The rush of flying a Class 90 O.S. Engine is beyond words; and you’ll just have to try it and experience it for yourself. Be warned, however, that once you fly something with this much power, you may NEVER be able to go back to a less powerful engine!
But on a lighter note, when shopping for your O.S. Engine, have some fun and really see which one fits your current and future flying needs. Many people have several helicopters with different engine size engines; some for when they want to cruise the skies, and others for when they want some severe power to perform some crazy stunts.
Regardless of the O.S. engine type that you choose, remember that each one comes with its own flavor. But most important, you should analyze your needs – including your budget limits – before you make a purchase.
Ready for a great RC helicopter adventure?
By Valentine Campos
Flying a model helicopter is rewarding, but rewards only comes with dedication and patience. If you want to go out and buy a helicopter, fix it in one day, and then zip around the sky like an expert the next day, then helicopter flying isn't for you.
Cost is another great factor to consider.
This hobby is by no means cheap. Crashes will happen, and when it does, you'll be spending several dollars to several hundreds on repairs and spares. You have to be mentally prepared to put that amount of money aside for the rainy days.
Lastly, flying a model helicopter is safe only if you are safe.
The rotating main blades of the helicopter spins at 1500 rpm, with a blade radius of about 1 meter. The speed of the blade tip is roughly 200 mph! At that speed, it will easily cut thru grass, skin and bones.
Never fly a model helicopter until you are completely and definitely sure that you will be able to control the helicopter.
And in the event that you loose control, no one, including yourself, is in the way of the ravaging loose runaway helicopter.
Register your radio with your local telcommunication authorities, and get some form of insurance coverage if your model were to hit other people's property or life.
All these small precautions will put your mind at ease and you can then fully enjoy the trill of learning, building, and flying the most sophisticated radio control model every designed - The RC Model Helicopter!
mCCPM and eCCPM Systems
mCCPM and eCCPM
What is the deal with mCCPM and eCCPM?
know how tough it is being a beginner. I was there once. It's already hard to grasp all the terminology that’s floating all over the place, but lucky you, I have more...
What I am going to do is tell you a little more about the swash plate.
I want to go into more detail on the hardware that controls the rotor movements of the collective pitch R/C helicopters, the swash plate.
To start things, there are two types of systems that you can purchase that control the swash plate on your R/C helicopter.
The two types are mCCPM and eCCPM.
Both are nice systems but each has its pros and cons…
Most R/C helicopters that are built today have the CCPM system, which means that the R/C helicopter uses some form of control mixing while in flight.
Some R/C helicopters like the Raptor and the Hirobo Sceadu use the CCPM (Cyclic/Collective Pitch Mixing) but in a mechanical mixing form called mCCPM (Mechanical Cyclic/Collective Pitch Mixing.)
On the other hand, R/C helicopters like the Fury by Miniature Aircraft, also use the CCPM but in an electric mixing form called eCCPM (Electronic Cyclic/Collective Pitch Mixing.)
There’s lots of discussion from both type of systems among pilots on which is the best to use. But like I told you before the mCCPM and the eCCPM have their advantages and disadvantages.
mCCPM – (Mechanical Cyclic/Collective Pitch Mixing.)
The mCCPM uses a servo for each axis. For example, one servo will move the swash plate back and forth. Then, the other servo will move the swash plate from side to side and the final servo will move the swash plate up and down for the pitch.
Still with me?
The advantage on the mCCPM system is that the setup is very simple. The bad part is that each servo’s life tends to be reduced by the extra work it has to carry out from moving the collective cyclic and pitch. It’s like having two guys watching the other guy push a car up the hill, eventually the guy pushing will wear out.
By the way, if any servo that controls the swash plate fails with the mCCPM system while in flight, you won’t have any control of that movement. As a result, your helicopter will kiss the ground very hard.
eCCPM (Electronic Cyclic/Collective Pitch Mixing.)
Next, the way that the eCCPM works is that it uses all three servos to move the swash plate to the direction you want your R/C helicopter to move. For example, all three servos will work as a team to make sure the swash plate moves from side to side, back and forth and up and down.
This makes the R/C helicopter respond quicker to flips, rolls and loops.
The advantages are that you will have less links that you’ll have to deal with when setup comes along. Also, the servo’s life expectancy is longer compared to the servos that are on the mCCPM setup because all of the servos work as a platoon reducing the friction to each servo.
It’s like having all three guys help push the car up the hill, makes things easier don’t you think? And if one servo fails, you will get the opportunity to save the helicopter from slamming onto mother earth.
And of course we have the disadvantages. The bad part with eCCPM is that its complicated to setup compared to the mCCPM. And, you have to make sure that you have a transmitter that supports eCCPM mixing.
But let me tell you this. It doesn’t matter what type of setup you get stuck with. Just make sure that it fits your flying needs and the number one biggie, is that you use the proper setup for it before attempting any flying.
วันอาทิตย์ที่ 16 มีนาคม พ.ศ. 2551
Starting with radio control helicopters
RC Radio Control helicopters have become a very common remote control model lately and they can be found in a variety of prices and types.
Some of the problems that new users face is what type of remote control model to start with, gas for it and whether they want an indoor or outdoor one. With many more options on top of those you can see how difficult it is for new users to get going.
The first thing we have to look at is what type of power source is best for you.
If you are a new remote control model pilot, then the most sutable power source for you is electric.
Electrically powered chopper engines are still very fast, and yet still quiet, and can manoeuvre just as well as a full sized fuel powered one! Another major attraction of electric helicopters is the fact that you don’t have to deal with messy fuels or with tuning the engine at all. in adition fuel is more expensive and electricity is much cheaper.
If you are a new pilot then I definitely recommend that you get an electric powered remote control model and then progress your way up to a glow powered one.
Glow engines have been used in RC airplanes for a time now, and have become more popular in helicopters.
If you want to seriously get into the RC helicopter hobby, then a glow engine chopper is perfect for action, constructing, maintaining and flying! You will be able to modify your chopper exactly the way you want it, change things such as hover time and rotor speed.
When you get a feel for your helicopter, and have everything set up perfectly, your helicopter will move just the way you want it and not the way some factory decided it should.
The next challenge the new helicopter pilot will face is learning how to fly their helicopter.
This might be big problem since a helicopter is the hardest air borne vehicle to control and having a tiny version of one doesn’t make things simpler.
If you have no helicopter flying experience and you try to fly it, most likely it will hit the ground. To save yourself frustration you need to find out how to properly construct and control it.
I would recommend that you devour the instruction manual, front to back, before you try to construct it and when you actually do, make sure you tighten every bolt and include every screw. Remember that just one missing screw or loose bolt can throw the whole helicopter off and send it crashing to the ground because it is unbalanced.
Learning how to fly a helicopter is a challenge within itself, and could never be fully taught remotely.
The best way to progress is to get real flying experience with an instructor at first, and then on your own later. You can find an instructor at your local helicopter club. RC airplane clubs are most common and exist in just about every place, and since most of them will have experience with planes they most likely will also know how to fly RC model helicopters too.
Article Source: http://www.articlerich.com
วันศุกร์ที่ 14 มีนาคม พ.ศ. 2551
Rotor Review - Gazaur Technology Poseidon 480 & Mars 480
Both models are made with carbon side frames and CNC-machined aluminum main rotor heads. They feature a symmetrical servo mounting system for 120-degree electronic cyclic collective pitch mixing (eCCPM) control. All 3 servos are spread evenly around the main shaft and give unprecedented accurate control with minimal cross coupling between controls. The flight performance is excellent; they are very stable in hover, fast and groovy in forward flight, and very graceful in 3D. These models are going to set a new standard for high-performance mini-class electric helicopters. Plus, the models will be sold and fully supported in the U.S. by Hobby Lobby.
The kits have good English instructions with excellent computer-generated engineering drawings. The parts are separated into three large bags according to assembly steps, and then the nuts, bolts and small components are separated into smaller bags to make them easy to identify and fast to assemble. It should take an average modeler about five hours to assemble the mechanics and then another three to install and set up the radio, motor and ESC.
Unique Features
The carbon frame layout is very unique, with 3 servos mounted in the middle of the frame. The metal servo tray also functions as the strong support for the main rotor shaft. The innovative landing gear design is soft-mounted to the frames without using any screw to help absorb shock. This landing gear is lighter than conventional skid systems. The moving flybar system (MFS) main rotor head design is the highlight. In a MFS system, the entire flybar can float up or down when collective pitch control is applied. The MFS design reduces the parts count by eliminating the washout unit. The MFS rotor gives the Poseidon and Mars very desirable handling. The geometry of this MFS system was laid out carefully so the collective pitch is not overly sensitive as on some other small electric models.
A constant-drive main gear system is included to keep the tail rotor spinning during autorotation. The tail rotor drive belt tail is guided by four pulleys to reduce friction. The Mars and Poseidon are designed for flying with 315mm up to 340mm main rotor blades. I successfully autorotated using 325 and 340mm blades, but doing autorotation with any mini electric helicopter should be attempted only by pilots with extensive autorotation experience.
The tail rotor blade pitch control mechanism is very well designed. The tail rotor pitch control lever grabs the pitch slider from above and below, and it provides smooth and precise pitch change. Each plastic tail rotor blade has a built-in leading-edge balance weight to help reduce control power needed to actuate the tail rotor blades. This is quite innovative. A 2mm carbon pushrod provides a direct control run to a tail rotor control servo mounted on the center of the helicopter. There’s plenty of room in the frame for the mounting receiver and gyro.
I used the Hitec Premium mini electric helicopter flight pack for control. There are two locations reserved on the Mars and Poseidon for mounting the receiver and gyro and the locations can be swapped depending on the builder’s preference. To install the HS-65 servos on the Mars and Poseidon, the servo tray requires opening up the HS-65 servo and splitting it into two halves, then mating the servo halves back together from each side of the servo tray.
The Poseidon and Mars are designed for 400-class brushless motors, an ESC with at least 35 amps, and a 3-cell, 2100mAh LiPo battery. The Poseidon and Mars are slightly bigger than other helicopters in their class, and this helps give the Poseidon and Mars some added stability and visual aid when flying farther. The ultimate power combo is the Gazaur Lingo 8 outrunner motor and Gazaur 55A ESC designed for the Poseidon and Mars. The Lingo 8 motor is bigger and has more torque than most 400-class mini electric helicopter motors. The Lingo has a 4000Kv rating and when used with the supplied 10- or 11-tooth pinion, it is possible to get 2600 to 2700rpm with the Gazaur 340mm wood blades and 2800 to 2900rpm with the Gazaur 325mm wood blades. The 325mm wood blades give very good 3D hot-dogging and four and a half minutes for 3D flying. The 340mm wood blades provide higher efficiency and still give excellent 3D performance, and it is possible to obtain five minutes of 3D or seven to eight minutes of cruising around.
Summary
The Poseidon and Mars have very high-quality parts, the flight performance is outstanding, and the models are innovative and different from other mini electric helicopters. The models have an almost hands-off hover. In forward flight, both models are very agile and aerobatic.
Electric RC Helicopters, The New Wave
Not long ago, very few have ever had the pleasure of getting a taste of flying these amazing machines. For a simple reason - once upon a time they cost way too much to buy and way to expensive to maintain. Alas - many thought this hobby would be and forever remain amongst one of those exclusive to the rich. Also, some people did not like the smell of gasoline exhaust or the loud noise of the engine. Fear not! Those days are gone!
Most people can now very easily afford to fly RC Helicopters thanks to the tremendous improvements of batteries, motors, and general electronics in the past few years. These innovations result in a new field of RC - Electric RC Helicopters - which at the same time opens up a whole new realm of possibilities. These include flying helicopter indoors and right at your own backyard while at the same time causing absolutely no pollution and much less noise. Moreover, maintenance costs which used to scare most people now shrink down so low that it won't hurt your wallet in any way!
Recent technologies also allow Electric RC Helicopters to be built much smaller than their gas counterparts. In fact, electric RC helicopter also took on the nick name: micro RC helicopters. This not only fulfills many people's childhood dream of indoor flights, it also makes for easy transporting. Not that it has to be carried very far since it can be flown right at your house.
The need for tedious maintenance greatly decreased as well. With electric helicopters, you can forget hauling around heavy flight box full of equipment. If any repairs became necessary, it can usually be carried out in full with nothing more than a screw driver. Often times repair can be made using bare hands.
Reliability of electric RC helicopters also improves greatly when compared to the gas versions because they use electrical motors instead of nitro engines. Electric motors come much cheaper than gas engines, much less tedious, and much less dirty. Unlike gas engines, electric motor almost never cuts out like an engine does. This means no more stalled engine in mid air!
Don't think for one second that electric flights won't last long. Modern RC models use Lithium Polymer batteries. These types of batteries will allow Electric RC Helicopters to stay up in the air as long as - or longer - than gas helicopters. Moreover, when running out of gas, nitro helicopter engines will suddenly cut out. On the other hand, their electric brothers will slowly power down with ample time to land.
Electric RC Helicopter also makes it easier for beginners to get a hang of this hobby. Whereas nitro helicopters can easily draw buckets of sweat from learning pilots, an Electric RC Helicopter proves much easier to master. While even beginner nitro helicopters requires at least six channels to fly, Electric RC Helicopters starts at only 2, 3, and 4 channels.
Some models even use two main rotors that turn in opposite directions, eliminating the need for a tail rotor. This means one less channel to worry about while learning. And what's more, most of these beginner helicopters fly right of the box. No more spending weeks trying to assemble complicated kits.
On the other hand, for experienced pilots, high-end model Electric RC Helicopters such as Align's T-Rex 450 and T-Rex 600 offers high performance 3D crafts that willexcite even the most avid pilots.
Where once flying a small model helicopter around in your own home was once a far-fetched dream, Electric RC Helicopters has made that dream a very vivid and extremely enjoyable reality!
Radio Control Micro Helicopters
Great question and the short answer is because they are fun and will allow you to have a great time, they are also quite inexpensive and quite robust.
All this from a Mini RC helicopters that fits in the palm of your hand, well that is why they are called RC Micro Helicopters.
These little engineering miracles can be flown indoors and they do not require hours of balancing and practice before you can get them into the air, no these little bundles of fun are brilliant for anyone who is young at heart from 8 - 80.
The Micro RC Helicopter is the smallest of the Mini helicopters range and can be flown quite comfortably in a bedroom or front room to amaze your friends and family.
If you know anyone who has ever wanted to fly a helicopter either for real or via remote control then this would be a great gift for them, it comes ready assembled and ready to fly so you need not have any experience or specialist tools to get the most out of the Mini remote control helicopter.
You can get a lot out of this small package including hovering and some nifty little manoeuvres once you have practiced for a while this is what an Indoor Helicopter can do for you.
The Indoor RC Helicopter comes complete with remote control and battery charger and is ready assembled so you do not loose any valuable fun time.
As you can see we have so many to choose from, click on the image for more details and the best price you will find anywhere.
RTF Helicopters, Are They Really "Ready To Fly"?
By: Victor Epand
Electric RC Helicopters have enjoyed a sudden rise in popularity due to recent significant improvements in the radio-control and electronics industry. As their components improve in quality while at the same time getting cheaper in price, many manufacturers launch beginner models labeled as RTF or "Ready to Fly"- but are they really?
In fact, the phrase "Ready to fly" was born in the days of more "traditional" RC aviation. What it actually meant, at least initially, was "required no assembly". It didn't mean that RTF kits didn't require set-ups, tuning, or tinkering before it could take to the air.
Nowadays, however, new pilots just starting out with this hobby expect their new model that comes labeled as "flying right out of the box" to do just that. Unfortunately, that is not always the case.
Very often, beginner pilots realize that RTF helicopters are not so "ready to fly" when they learn that keeping them in the air is quite difficult, especially for four channel models. While there are co-axle models available which are relatively easier to handle, they too require hours of training.
Also, these helicopters with their rotor blades spinning at extremely fast speeds can cause serious injuries. Therefore, no one would want an out-of-control helicopter of any size in their vicinity. Many would soon conclude that even for these RTF fliers, the best approach is to first learn in a simulator. This fact alone means that even easiest to fly RTF helicopter requires practice, and often times, lots of it - upsetting the very concept of "flying right out of the box".
RTF Helicopters doesn't always come with everything you need to fly as most people would think either. The most common missing component is the battery back for the radio controller - they usually come with a battery rack that requires 4 to 8 AA alkaline batteries. More serious fliers usually end up buying a rechargeable pack not long after their initial purchase of the kit.
Another popular missing component is a battery charger. These RTF kit usually comes with very rudimentary adaptor that you can plug right into your battery pack, which by all accounts, doesn't constitute a "charger". They don't even cut the electrical flow when the battery is full (which, by the way, may lead to over charging and ultimately, the explosion of the battery pack). In fact, many find it ironic that these RTF kits include a battery pack but no charger.
Not until very recently has this issue been addressed and few very new models (such as the LAMA IV by Esky) come complete with an adequate charger.
Nevertheless, there are some helicopters that are truly "ready to fly" right out of the box. These are the 2-channel models such as famous Picoo Z. Not only are they ready to fly, they are palm-size, allowing for them to be flown just about anywhere that is windless. These little fliers are also pretty durable, enabling them to withstand crashes after crashes. However, they are much less maneuverable than four-channel models.
All in all, there are many kinds of RTF kits and some are more "ready to fly" than others. Those who want models to work seamlessly right out of the box can settle for 2 channel models, compromising maneuverability. On the other hand, those who want more flight-capable models may go for 4 channel models, only to find that they are not as ready to fly as advertised. Nevertheless, these RTF kits provides a great lesson for enthusiasts new to this hobby; one that teaches them to fly as well as to endlessly enjoy setting up, modifying, and upgrading their models.
Article Source: http://www.articlerich.com
Coaxial RC Helicopters: How Do They Work?
So where did such stability come from? To answer that, the first step lies in understanding how helicopters work. A single-rotor helicopter generates lift when their rotor rotates. As the main rotor turns, another force will also be generated - known as torque, which will in turn cause the entire fuselage to turn in the opposite direction. Since the days when helicopters were in their nascent stage, their pioneers have learnt to counter this effect by including another smaller perpendicular rotor in the tail. This rotor counters the any rotation generated by the torque as well as provides pilots a mean to control the direction in which the helicopter's nose is pointing at, more technically known as the yaw. To control the yaw, the pilot simply changes the pitch (or the angle) of the tail rotor.
Coaxial helicopters, on the other hand, eliminate the need of a tail rotor completely. This is due to the fact that these fliers have two rotors, one on top of the other, rotating in opposite directions. In effect, the torque generated by each rotor cancels out one another. When such feat is coupled with two rotors' lift complementing each other results in the extraordinary stability and hovering ability. Because hovering is one of the main components of a helicopter's flight, "easier to hover" is almost synonymous to "easier to fly". Controlling the yaw in this setup becomes only a matter of slowing or speeding up one of the two rotors. Another merit that comes almost as a bonus is that theoretically, these helicopters do not require a gyro - which means that much less tinkering and setting up is needed.
Although very widely praised, coaxial helicopters are not without faults. The first one stems from the fact that in order to fly, the speed of the two rotor blades must be equal. In fact, these helicopters are so dependent on the synchronicity of its blades that even the slightest deviation is detrimental. So much so that these helicopters will just spin wildly on the ground, never to lift off. Their two motors simply have to always be in their most pristine state. Also, the stability of these helicopters comes at the price of sacrificed maneuverability; they are notoriously slow and unresponsive. Nevertheless, perhaps the utmost annoyance comes when the two blades bite into each other in mid air when most extreme cyclic controls are applied.
All in all, coaxial helicopters are here to stay. They have become the favorite beginners' RC helicopter. At the same time, many experienced pilot enjoy a flight or two of easy indoor flying with these helicopters once in a while.
Note: Although these coaxial helicopters are "relatively" easier to fly than their conventional counterparts, they still require hours of practice. Also, their fast rotating blade can cause just as much injury as bigger model helicopters. Therefore, never treat them like toys.
Article Source: http://http://www.electric-rc-helicopter.com
วันพฤหัสบดีที่ 13 มีนาคม พ.ศ. 2551
Rc Helicopter Flights: How Easy!
So how difficult is the model helicopter to control in fight? Well, it has been described as similar to balancing a steel ball on a knife edge whale riding a bicycle! Added to this is the type of thrill that is involve every second of flying. The electric RC Helicopter is also much cheaper than the next type of RC Helicopter: the gas RC Helicopter. So here are the things you should know in order to get you end up getting the right radio-controlled helicopter for you. Evaluate your flying skill.
You can also start with a scale-model plastic helicopter. There are model RC Helicopter that are made from wood. If you want to fly with the airplanes (which they tend not to like when you hover all over the runway) you will need AMA insurance. Homebuilt RC Helicopters are motorized (although wit less power) and can lift you off from the ground with the same experience you can get from a conventional full-size helicopter.
What kind of engines do RC Helicopters run on? Special remote control RC Helicopter engines. They come in 2-stroke and 4-stroke glow burning engines as well as 2 stroke gasoline models. If you descend to quickly you will enter your own down wash and the RC Helicopter will pull itself into the ground and need considerable collective to compensate. This is a bad condition. Full RC Helicopter guide at http://www.rchelicopterguide.info/heli/index.html. The HELICOPTER STATS give you a brief guide to price. If the RC Helicopter has NOT got RTF beside it you will have extra costs to get it flight ready and will have to do some building.
Then there are the bad RC Helicopter crashes where you look for the parts that aren't broken. Thanks to James for providing this sample of what happens when you turn a rotary-wing into a fixed-wing while in flight. Do not over-react and send it launching into the sky. All problems were eventually overcome and the fully controllable R/C model helicopter had arrived.
Just take it easy and if it gets "on top of you" do not touch anything but a little forward cyclic for 1 or 2 seconds. Before we start it is traditional for other pilots to share their experiences so get there and ask ask ask and ask.
Article Source: http://www.articlerich.com
RC Helicopter vs RC Planes
Since RC Helicopter flying takes every kids and kids at heart to the closest experience of flying a real helicopter it is undoubtedly thrilling and exciting experience. In terms if RC Helicopter sizes - here you can trim down your choices into gas electric mini micro and toy.But in the case you want to upgrade to ultralight you can easily get familiar with flying since you have already been with an engined-helicopter.
If you prefer building model helicopter for your personal gallery. Just follow the entire manual to the 't' Do not get all excited when the heli is all put together you still have many hours of configuring / balancing / and adjusting everything. Homebuilt RC Helicopters are motorized (although wit less power) and can lift you off from the ground with the same experience you can get from a conventional full-size helicopter.
What kind of engines do RC Helicopters run on? Special remote control RC Helicopter engines. They come in 2-stroke and 4-stroke glow burning engines as well as 2 stroke gasoline models. If you descend to quickly you will enter your own down wash and the RC Helicopter will pull itself into the ground and need considerable collective to compensate. This is a bad condition. Model enthusiasts are notably quick to emulate full-size aviation achievements, but were not as successful with rotary wing aircraft, and it was not until 1968 that the first fully controllable R/C model helicopter appeared, built by Dr. Dieter Schluter of West Germany.
Full RC Helicopter guide at
Rc Helicopter On Gas Vs Electric Rc Helicopter?
Why choose gas RC Helicopter? Forget about the price since gas RC Helicopter does not come cheap. RC Helicopter flying has become a better alternative to flying a real helicopter. It costs less and completely safe from crashing. But that is not all. RC Helicopter flying has become a hobby for those who have the passion on helicopters. If you are looking for a radio-controlled helicopter the most difficult question to answer is: "what should I buy?" Bear in mind that if you skip to answer this question then you might be ending up with a one time flying experience.
Some collect model RC Helicopter that really fly. Just follow the entire manual to the 't' Do not get all excited when the heli is all put together you still have many hours of configuring / balancing / and adjusting everything. Here's the analogy: if bicycle is to motorcycle; homebuilt helicopter is to twin-engine helicopter.
Nowadays most RC Helicopters come in a easy DIY pack with very clear instructions on how to put your RC RC Helicopter together!. Practice in a little more wind... wind really makes a 30 size jump around be on top of it! Practice controlled flight. Try to make the RC Helicopter go exactly where you want it to. Full RC Helicopter guide at http://www.rchelicopterguide.info. The Bumblebee RC Helicopter is so small and hard wearing (G10 materials) meaning you will hardly ever have to buy spares reducing your costs!.
others say there not needed. If your helicopter banks yaws or pitches by itself you need to compensate with trim. Practice hovering from 6 inches to 1 foot. Be prepared for gusts: wind will increase the effectiveness of your rotor blades and make your helicopter climb fast. Before we start it is traditional for other pilots to share their experiences so get there and ask ask ask and ask.
Article Source: http://www.articlerich.com
5 Steps To Piloting RC Helicopters
Of all the RC crafts available, radio controlled helicopter is arguably the hardest to master. However, with the advent and advances of today’s RC flight simulators, the learning curve have decreased. Now, new RC helicopter pilots can literally crash as often as they want until they can eventually keep their helicopter in the air. Nevertheless, conventional RC helicopter training lessons has not lost their importance. For some, they provide a guide to practicing in the simulator. For others who don’t like simulators - or for some reasons can’t get their hands on one, flying lessons are invaluable. For those that choose to go the no-simulator route, it is generally recommended that you hire a certified instructor. But, with the increasing popularity of cheaper electric RC helicopters, the cost involved with this hobby decreased exponentially. As a result, many new pilots are choosing to learn to fly with neither a simulator nor an instructor. No matter how you choose to learn to pilot RC helicopters, this article which provides classic helicopter lessons will definitely come in handy.
Lesson 1: First Feel of Helicopter / Ground Exercise
First things first, have your helicopter properly trimmed and set up before doing anything. Most electric models are already set up right out of the box. If your model requires any setting, make sure you follow the instruction in the manual or hire/ask someone knowledgeable to do it for you. Trimming won’t be covered in this article because it is a whole topic in itself.
Once your helicopter is trimmed, you’ll need a simple pair of training gear for bigger models. You can actually make one yourself using two four-inch rods and four balls (ping-pong balls will do nicely). However, it may be easier to buy one. If you are learning with a co-axle ready-to-fly electric helicopter such as the Lama or Walkera 54, then the training gear is unnecessary. On the other hand, if you are learning with a bigger and more conventional model such as the T-REX, then having a training gear is absolutely mandatory.
Now, you’re going to pilot your helicopter for the first time. However, for this first lesson, the goal is to learn what it "feels" like to control one. Therefore, what you want to do is to bring up the throttle/collective to the point where the helicopter is just about to lift off the ground but not quite taking to the air yet. With the helicopter in this half on the ground, half wanting to lift off phase, move the cyclic control around and see as well as get a feel of how the helicopter will react to each control. Do this several time until you have adequately felt all of the controls and more importantly, understand them.
Lesson 2: Hover (Tail In)
Once you’ve mastered the ground exercise, the next step is to hover. Every helicopter pilot and instructor will tell you that one of the most (if not the most) important component of a helicopter flight is hovering. In fact, no matter how fancy the flight, at its most fundamental level, a helicopter flight starts and ends with a hover.
For this lesson, make sure the tail is pointing in towards you. Bring up the throttle to the point that the helicopter is just about to hover just as you did in the ground exercise. Then, get the helicopter as stable as you can get it. After doing that, give it a little more throttle/collective. Remember that you should make the helicopter stable on the ground first before giving it the extra throttle to lift it off the ground. Doing this will make this lesson much easier. When the helicopter starts to lift off the ground, it’ll continue to ascend slowly. Bring the throttle down slightly to stabilize it at around 1 foot.
Next comes the hard part. Try to keep the helicopter hovering in one spot. This will prove to be very difficult at first. Draw on what you’ve learnt on from the ground exercise. Once you’ve hovered for around 30 seconds, bring the throttle down just slightly and the helicopter will start to slowly descend back to the ground. Don’t throttle down too fast or your helicopter will come crashing down and be damaged.
Try hovering many times. Between each hover, reflect on what you did right and what you did wrong. You will find that each hover will be more precise and more controlled than the last.
Another important point during this lesson is to always point the tail of the helicopter towards you. Don’t try to point the helicopter in any other direction at this point as you will very likely get disoriented. Orientation training will come later.
Once you’re comfortable with hovering at 1 foot, try bringing the helicopter up to an altitude of 3 to 5 feet. It will seem scarier but in fact, hovering at 3 - 5 feet is easier than hovering at 1 foot. Keep doing this exercise until you can hover for an entire flight of the battery pack or the fuel tank, which equals to around 7 to 10 minutes if you’re practicing on a simulator.
Each pilot takes different amount of time to learn this crucial skill. Some get it extremely fast (within days) while others take weeks or even months. Don’t be discouraged, take your time and learn at your own pace. As long as you have fun while practicing, who cares how long it takes. Don’t rush through this lesson. It is very important that you learn to hover and can do it comfortably.
Lesson 3: Basic Flight
Once you’ve mastered hovering, the next step is basic directional flight. Get your helicopter to hover as you’ve done in the last lesson, then pick a spot and pilot your helicopter there. Then pick another spot and do the same thing. At this point, you want to keep the helicopter in a tail-in position. Keep doing this until you feel comfortable that you can get your helicopter to go anywhere you want while it’s in a tail-in orientation.
Lesson 4: Nose-In Hover
After having mastered hovering and basic flight while flying tail-in, the next step, the nose-in hover, will be relatively more challenging. The idea behind this exercise is quite simple; simply hover like you did lesson 2, but this time, hover with the nose of the helicopter pointed towards you. While this may sound simple, many new pilots find this extremely difficult due to the fact that most of all the controls are now reversed. At this point, you may already confident about flying and feel that you can easily perform this hovering exercise at a high altitude. Please refrain from doing that. Instead, start this exercise by hovering at 1 foot, then slowly increasing the altitude to 5 feet as you are more confident and comfortable with the now-reversed controls. Keep doing this exercise until you can master hovering with the nose pointed towards you. Having accomplished this lesson will greatly improve your orientation awareness.
Lesson 5: Square and Figure 8 Flights
This final lesson will combine the skills you’ve learnt from previous lessons, namely, hovering, orientation, and direction flight. The combination of these skills will produce a full flight. The first goal is to try to navigate your helicopter in a square pattern. If you’ve been following the exercise without cheating, you’ll find that the square flight can be accomplished quite easily. The next goal would be to fly in a figure 8 pattern. This will prove to be more challenging but it is definitely not out of reach. As you do more and more figure eights, concentrate on keeping the 8 a perfect shape. Try your best not to veer off course. Becoming more experienced, you should aim for more and more flight control accuracy. Once you’ve mastered the figure 8, you should be able to pilot your helicopter anywhere you desire. Practice makes perfect, but also remember to have fun; after all, that is the whole point of a hobby.
Article Source: http://www.articlerich.com
The Legacy of the Helicopter Developed by Design
The helicopter and the airplane are undoubtedly the most important inventions of the 20th century’s aeronautical industry. People have had dreams of flying since they were born. Leonardo da Vinci, the Italian genius, was the first person who ever drew a sketch of a manually piloted helicopter. It stirred some water at that moment, but it wasn’t until the 20th century that the first modern helicopter was built, in the late 30s.
There are many and important differences between the airplane and the helicopter. Although we are not going to talk about the plane much, its basic idea is that it has to execute a forward motion in order to be able to move. The wings have the purpose of generating a force which neutralizes the gravity force when they are moving through the air, and this is exactly what makes the plane fly.
The helicopter is very different. Its ability to hover into the air without even moving is unique. This is caused by the continuous motion of the blades. This has a main factor, like in the case of airplane wings, the air resistance force.
The force which the rotating blades generate is equal to the weight of the helicopter when the helicopter hovers. If the pilot wishes to take the helicopter to a bigger height, the blades’ positioning angle must be modified. The pilot has the ability to do this simultaneously with all the helicopter’s blades.
The helicopter has only one engine, and this engine is used to spin the rotor. Although most helicopters have a single main rotor, there are some who have two. They are meant to offer a greater stability for the helicopter by spinning in different directions.
Most helicopters have a single main rotor though and a smaller one which produces a horizontal force at the tail of the helicopter. If, by any chance, the engine fails in mid-air, the main rotor’s spin will be significantly reduced. This means that the rotor won’t be able to provide the necessary ascending force for the helicopter to fly.
However, even in this desperate situation, a helicopter can still land safely, especially if there’s an experienced pilot on board. This can be done through a method called auto-rotation. This is also one of the main advantages of the helicopter, the fact that even in the most difficult conditions it can bring a pilot safely to the ground.
Helicopters have many uses, from warfare to saving lives or as a transportation means. The most technologically advanced ones are a menace on any battlefield, due to their sheer maneuverability and stealth. There are also big helicopters used to carry military equipment from place to place. Also, rich people can afford helicopters which are able to get them from place to place very quickly.
Then, helicopters are also used in rescuing people from difficult situations, in places where nothing else could reach. For example, countless persons have been saved from remote mountain tops or from rough seas. This could have never been possible otherwise, and this is maybe the biggest utility of a helicopter.
Hirobo Lepton EX-3D Review
By: Tara Soonthornnont
Electric RC helicopters are becoming so popular that RC helicopter manufacturing giants who used to stick with gas models are starting to produce electric ones. Recently, Hirobo follows that trend and released a new high-end electric RC helicopter, the "Lepton EX-3D". This model is one in which Hirobo claims is capable of flying the most advanced 3D maneuvers right out of the box - a claim in which RC Flying Thailand sets out the test.In fact, before actually getting their hands on this model, RC Flying has had two chances to see it in flight. In both occasions the flight was flown under constant heavy winter wind. Nevertheless, the Lepton didn’t show any problems and landed safely. Therefore, even without flying it, it is safe to say that the claim that this model is extremely wind-resistant is well founded.
The Lepton EX-3D is a world class helicopter made by a world class RC helicopter manufacturer who aims to please advance pilots. The whole model stands just slightly smaller than a typical .32 gas model, making it durable, wind resistant while at the same time easily transportable.
Hirobo Japan positions the Lepton EX-3D as one of their top models. In this honor, they gave the model two separate but integrated bodies. The outer made of Carbon Hybrid and the inner made of Magnesium. These two bodies serve to eliminate vibrations and the combination boasts a 200% increase in heat dispersion rate as opposed to aluminum. Experts claim that the integration of two bodies is the secret of making the Lepton EX-3D wind resistant. The Head is made of aluminum and the rotor blades are made of fiberglass.
As for the battery, if you decide to purchase the "combo" version, the Lepton comes with a 4-cells Li-Po battery along with a "Balance Cell" charger. The battery takes one hour to charge - which will allow for an 8 minute worth of normal flight or 5 minutes worth of 3D flight.
The only thing might make prospective buyers stop to think a bit is the price. Being the top model, the Lepton carries a heavy price tag. In fact, its price rivals that of a gas RC helicopter. This in a way defeats the purpose of it being an electric model. However, some will say that having the "Hirobo" brand on its fuselage will make it worth its price. Also, CPA Product, the only distributor in Thailand counters any complaints regarding the Lepton’s high price saying "you would buy the Lepton EX for the same reason that you would buy a Mercedes."
วันอาทิตย์ที่ 9 มีนาคม พ.ศ. 2551
How to Safely Dispose of Lithium, LiPo, LiPoly Battery Packs
Unlike NiCd batteries, lithium-polymer batteries are environmentally friendly. For safety reasons, it’s best that LiPo cells be fully discharged before disposal (however, if physically damaged it is NOT recommended to discharge LiPo cells before disposal - see below for details). The batteries must also be cool before proceeding with disposal instructions.
To dispose of LiPo cells and packs:
1. If any LiPo cell in the pack has been physically damaged, resulting in a swollen cell or a split or tear in a cell’s foil covering, do NOT discharge the battery. Jump to step 5.
2. Place the LiPo battery in a fireproof container or bucket of sand.
3. Connect the battery to a LiPo discharger. Set the discharge cutoff voltage to the lowest possible value. Set the discharge current to a C/10 value, with “C” being the capacity rating of the pack. For example, the “1C” rating for a 1200mAh battery is 1.2A, and that battery’s C/10 current value is (1.2A / 10) can be used, such as a power resistor or set of light bulbs as long as the discharge current doesn’t exceed the C/10 value and cause an overheating condition. For LiPo packs rated at 7.4V and 11.1V , connect a 150 ohm resistor with a power rating of 2 watts (commonly found at Radio Shack)to the pack’s positive and negative terminals to safely discharge connecting it to an ESC/ motor system and allowing the motor to run indefinitely until no power remains to further cause the system to function.
4. Discharge the battery until its voltage reaches 1.0V per cell or lower. For resistive load type discharges, discharge the battery for up to 24 hours.
5. Submerse the battery into bucket or tub of salt water. This container should have a lid, but it should not need to be air-tight. Prepare a plastic container (do not use metal) of cold water. And mix in 1/2 cup of salt per gallon of water. Drop the battery into the salt water. Allow the battery to remain in the tub of salt water for at least 2 weeks.
6. Remove the LiPo battery from the salt water, wrap it in newspaper or paper towels and place it in the normal trash. They are landfill safe.
© Draganfly Innovations Inc.